How to download and setup Epson PhotoPC L-400 printer driver
Epson PhotoPC L-400 Printer errors like “Windows fails to recognize the new hardware” are not uncommon, especially as soon as you are trying to setup your Epson PhotoPC L-400 printer or connect Epson PhotoPC L-400 to your personal computer. It is likely that Epson PhotoPC L-400 printer driver was installed incorrectly in such a case, & for this reason Windows is unable to recognize the device.

Fortunately, printer driver problems are easy to resolve. Read on to learn more about printer drivers, what causes the more common printer driver errors, and how you can troubleshoot printer driver troubles.
Download Epson PhotoPC L-400 printer driver
A laptop or computer printer does not work until you deploy the included drivers & software. If you have forget the disc for your printer, you may possibly download the driver for your printer & use the drivers to setup your printer.
What is Epson PhotoPC L-400 printer driver?
Printer drivers are software programs, & their main job is to convert the data you command to print from to the form that is specific to the setup printer. Every printer should come with the software used to deploy a printer in Microsoft Windows or your operating system.
Each Microsoft Windows version need a Epson PhotoPC L-400 printer driver compatible
Download and locate the correct driver that is most compatible with your Epson PhotoPC L-400 printer before going further.
We give you all printer drivers version to download free.
+ Get Epson PhotoPC L-400 printer driver for Windows XP
+ Get Epson PhotoPC L-400 printer driver for Microsoft Windows 7 and Windows OS Vista
+ Download Epson printer driver for Microsoft Windows 8/8.1
+ Get Epson printer driver for Windows 10
+ Download Epson PhotoPC L-400 printer driver for Mac OSX
+ Download Epson PhotoPC L-400 printer driver for Linux, Ubuntu
FREE DOWNLOAD Epson PhotoPC L-400 DRIVERS
How to get your OS type:
Before download Epson PhotoPC L-400 printer driver, you need to understand what is your Operating operating system type.
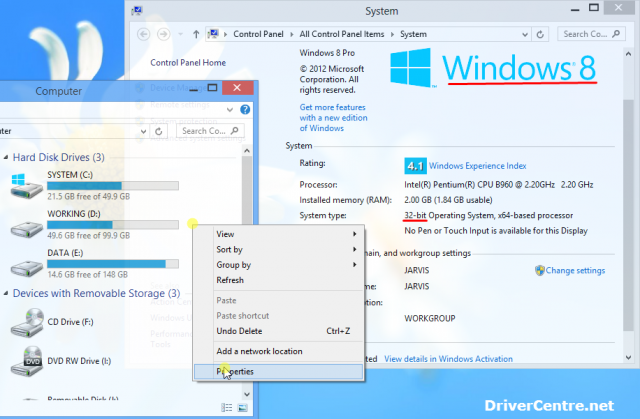
Now you must go to your desktop and click “Computer” or “My computer“. Right Click in Computer folder, then click “Properties” and review the operating system type & name. By doing this, you can look for the driver your system needs.
When you must get and install Epson PhotoPC L-400 Printer driver?
Printer driver is configured incorrectly
Epson printer is not compatible with the mounted printer and also your version of Windows
The entry of your Epson printer in the Windows registry is incorrect
Malware has infected your Epson printer files
Missing Epson PhotoPC L-400 printer driver because you reinstall Windows OS OS or Mac OS
You forget deploy Epson PhotoPC L-400 printer driver
Plug in your Epson PhotoPC L-400 printer in another computer that does not deploy driver
You laptop or computer appear issues: Windows Operating System fails to recognize the new hardware, anytime you trying to connect your Epson PhotoPC L-400 Printer to your laptop
How to setup Epson PhotoPC L-400 printer driver?
Step 1. After everything has been plugged in turn the laptop or computer & Epson printer on.
Step 2. While you have downloaded the drivers, run the downloaded mounted file
Step 3. Follow the installation wizard and once completed your software is established.
Step 4. Test the printer to make sure it is working
If Installation Wizard not working you may perhaps only install the printer driver by following the steps below
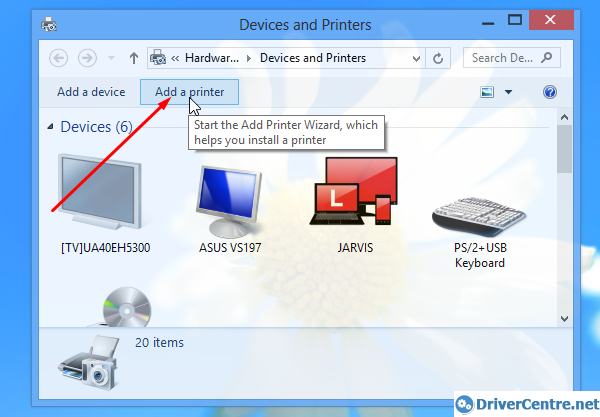 Click Add a Printer to begin Install Epson PhotoPC L-400 driver
+ Go “Control Panel > Printers” or “Printer and Device” in the Printers windows, click the “Add a printer” icon, After completing the above steps, you should see the “Windows Printer Wizard”. Click Next to start the wizard. And then follow the onscreen directions to setup the driver
Thank you for your reading